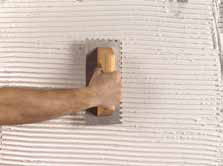
1.- Any appropriate adhesive material is applied to the wall so as to obtain a smooth surface.
We recommend using a thin set application (thickness of 5mm. Using a toothed trowel) with back butter technic. NOT NECESSARY TO PRE-SOAK TILES INTO WATER.

3.- Grouting is carried out with the recommended materials.
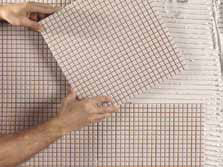
2.- Tiles of the Kunik series are put in place tight together, without using spacers
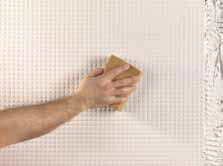
4.-Any surplus grout is removed
Glass Tilte Instalation Procedure
Before hiring an installer, check out a few of his or her completed projects as well as references. Ask former clients about the installer's timeliness, cleanliness, courtesy, and price. Be sure to visit not only recently completed jobs, but also jobs that have been in place for a couple of years, when problems are likely to have cropped up. The jobs should be similar in scope to yours and feature similar tiles. If you are using handmade glass mosaic tile, and all you see are factory tile jobs, the installer may not be comfortable with the challenges of handmade materials. When comparing bids, be aware that a low price may mean that the installer plans to take shortcuts such as filling a small space with grout instead of taking the time to cut tile. Ask your installer's advice and make your preferences clear, including how to treat grout. If you have any doubts about the tile itself, voice them now. A supplier will not entertain claims after installation.
Do-It-Yourself
Simple mosaic tile installations can often be handled by do-it-yourselfers, but others require the experience and skill of a professional. After spending good money for a quality product,
you may not want to take a risk by spoiling it with poor craftsmanship or an inadequate substrate.
1. Accessing the structure. The weight of tiled floors and walls is substantial. Ensure that the structure can support the weight of the tile and mortar, and
that there are no structural problems behind the wall.
2. Surface Preparation. The surface must be clean, level, stable, and, if necessary, waterproofed. Remove loose substances or nail them down securely and
patch as necessary. An improperly prepared substrate can lead to maintenance headaches, particularly in kitchens and baths where previous problems may have caused damage or lingering wetness
behind the walls.
3. Mortars and adhesives. It is important that appropriate mortar or adhesive is chosen for your job. The factors include the method of installation,
location, function, type of tile and budget. Generally there are 2 categories:
- Thin-set adhesives are designed to be strong in a relatively thin application. A thin-set installation costs less, can be completed more quickly, and cures faster than the thick-set method. It weights less than a third as much as thick-set installations. Thin-set has become the standard form; however, it cannot be used in every situation.
- Portland-cement mortar is generally used with thick-set installations because it is relatively inexpensive. A mixture of Portland cement and sand is usually used for floor; lime is added for walls. The thick-set method was standard until the 1950s when new products enable faster, less labor-intensive techniques. A thick-set installation is impervious to water and can compensate for irregular or unleveled surfaces. It allows an installer to create a gentle slope, facilitating proper drainage in a shower, or to correcting bad wall. Be aware that the height of the floor will be raised somewhere between 3/4 inch and 2 inches, in addition to the thickness of the tile.
4. Seal. Stone tile should be sealed to be water and stain resistant, a necessity in kitchens, baths, and
other rooms where spills are likely. Generally, there are 2 categories of sealer -- penetrating (water based) and surface (solvent based). Some penetrating sealers do not change the color of the
stone, others darken the stone slightly, and still others give the stone a distinct "wet look". Surface sealers, which are usually formulated from acrylic or urethane, impart a higher gloss,
highlighting the natural character and color of the stone. In most cases, sealer is applied after the tile is laid but before it is grouted. Your retailer will recommend a specific sealer
depending upon the following three factors: the porosity of the stone, where it is to be installed, and the look desired. Generally a water base product is for a bathroom or hallway, where
moisture resistance is key; a solvent-based one is usually better where grease is the culprit. All sealers have to be reapplied as they wear down every few years. Penetrating types merely need a
new coat, but surface sealers must be removed before reapplication. Check the manufacturer's recommendation and always test it before actually applying it to your actual floor or wall.
5. Grout. There is a wide range of options. The issues in deciding what grout to use are joint width, stain resistance, location, underlayment, and any
special factors, such as dampness or freezing conditions. Consult your grout supplier for a recommendation. Make sure you test the grout with your tile before an actual installation. Some tiles
can be stained by grout. Once the tile has set and any sealer has dried, Grout can be forced into the spaces between tiles with a rubber float or a squeegee, working one small area at a time.
Excess grout must be carefully removed by wiping the float across at a 90 degree angle to the surface, and then by wiping the tiles clean. Floor should not be walked on for at least 1 day, and
sometimes 3 or 4 days following installation. Use plywood board or kraft paper if it is absolutely necessary to cross the area.